


 As always, here is the kit list for the trip this Friday. I spent today packing and organising my things as Charl and I have a very busy week ahead – both at work and home.
All that remains for me to do is to pack some chocolate, stuff my sleeping bag and down jacket and make a decision on footwear.
8.8 KG all in isn’t all bad considering I’ve added walking poles and a windproof smock at 105g.
On the issue of walking poles, I have a confession I know I shall regret. I was considering the Trail Blaze poles from Bob and Rose but having never used poles before I thought they’d be a blind investment. Instead I took myself along to ‘The Maxx’ and got myself…….wait for it: a pair of children’s walking poles! I measured what length pole I’d need when I first had signs of my knee problems and 112cm is the magic number. When I found a pair of 110cm 6000 series aluminium poles at 190g each for £10, I recognised a sign from the gods when I saw one! Being small has its advantages sometimes.
Just a quick post as I am itching to tell anyone who dares stand near me for long enough.
On the last trip Paul and I were both really pleased with all of recent purchases and it was really starting to feel as though we’d found our flow with kit for the hills. However, during the changeable weather throughout our last trip, I’d noted that my layering system was a bit amateurish. The first area for improvement was a wind shirt. When the wind picked up on the move, the wind-stopper fleece was too hot to use (besides the fact its not that wind proof) and so I was adding my Marmot Precip. This was OK but still got quite warm on the move whilst a bit cold when standing. I looked at the Montane website and eventually spent some birthday money on the 2007 Featherlite Smock from Bob and Rose - on offer at £22.99. What a revelation! At 100g this thing works amazingly well for what is essentially a very thin pertex top. I’m hoping that this will work really well over my base-layer or mid-layer depending on the type of activity.
The next hole in my armour became apparent though on that night spent on Yewbarrow. The strong winds that evening really chilled the core and despite wearing all my clothes (save for gloves and the base layer for my legs) I found that standing about waiting for food was a chilly business. The tent was an option but the sunset was nice and it wasn’t raining for a change that day, so seemed a waste not to be outside.
A down or synthetic insulating layer was needed so I started looking around. There were a few options but all a bit pricey at this time of year. I’d wanted light, warm and extremely packable so looked primarily at the down jackets. I had considered the Montane Anti-Freeze, the PHD Minimus Down Jacket, the Mountain Equipment Xero and the wild card the Alpkit Fillet Vest.
Long story cut short, I decided that Christmas needed to be dealt with first and forgot about it (for about a day) and then noticed that Paul from Hike-Lite had a demo Montane Anti-Freeze on offer. At less than half price I couldn’t hesitate, I emailed a few queries and I couldn’t resist for £65.99 inc delivery – result. Review to follow on both of these items after the next trip on the 28/29th November. 8 days and counting…..
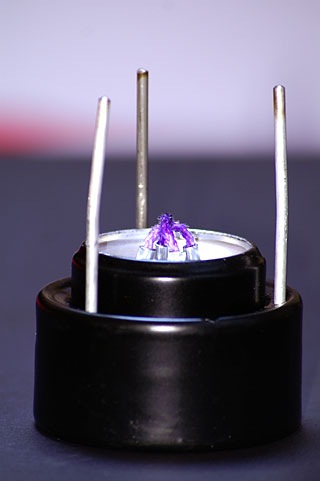
As a spin off from my last post I was having to bring my brain out of hibernation to work out a better windscreen option for the gas stove. I’d seen some home-made options at various places on the net and decided it was time to have a go at making my own (more robust) windscreen.
My current solution consists of some spare pot cosy material from Bob and Rose which I just hinged with some aluminium tape and propped up around the stove. The strong winds at the pitch on Yewbarrow on the last trip blew the wind shield on to the stove and melted it and so here I am!
There are any number of ways to set up a suitable windscreen but I fancied the sort of task you’d get on a Blue Peter audition so set about drawing out some ideas. I then came across a site (I forget where) that seemed like a great idea. The screen had two key parts: A horizontal base which was supported by a flange on the stove body and some foil to sit on this base to act as the wind screen. I liked that it was an integrated unit and strong winds couldn’t blow the material into the burning stove as easily.
My interpretation of this design is shown below.

This is of course a prototype (in all honesty it probably isn't and I’ll just use this forever and never ever make another one – but it sounds good if you say the word prototype) and since this photo was taken last night (camera phone – sorry guys) I’ve drilled out around 20 13ml holes to lighten up the base.
Its made from 0.8mm thick aluminium sheet which slots in any of the two slots on the F1 light stove just above the canister connection. The two ends are curved up to create a lip for two sliding plates to secure the foil screen to the platform. Because the F1 light stove has this 1mm thick lip the screen can be swivelled around 300 degrees on the centre axis to allow for changes in the wind direction. If the wind is really bad the whole of the foil screen can be unrolled to encase the flame and protect from the wind. Because the canister is not protected on any side and is raised off the floor by the Primus stove feet, overheating should never be a problem. In addition because the horizontal platform connects so well with the stove body it acts as a heat sink - moving heat away from the canister.
The downside is that even after weight shaving through drilling, it still weighs 48g with the foil. Bummer! I’m going to try it on the next trip on the 28th/29th of this month though to see if its worth it on those shorter, colder trips. Solo trips will always summon the God of meths and I’ll be bringing the trusty Blackfly 3.
Amen.
Since I melted my home-made windscreen on the last trip, I’ve coerced myself into thinking about what stove to take on the next trip. That being a return to Wasdale Head in the Lakes to finish what Paul and I started last time, but couldn’t finish.
It was particularly cold and windy on Yewbarrow that night and my windscreen blew in on the stove and melted whilst I was admiring the sunset. This gave way to the negative vibes about taking a canister stove over my trusty (and much loved) alcohol stoves and I vowed to have a think about what to do for next time.
When I do these trips with Paul, I don’t feel taking the alcohol stoves is appropriate most of the time as Paul takes nothing other than his one trick Jetboil which means he’s packing up and ready to rejoin the trail just as my water is starting to boil. However, I’m going to be doing a few more solo trips over the winter and I’ve decided that nothing other than an alcohol stove such as the Isofly or Blackfly 3 will make it into my pack.

This aside I have an outstanding issue then with the windscreen so I need to work out a more durable, lightweight and packable windscreen for my F1 Lite gas stove. Research required me thinks.
I know this is a little late in the game for this, however I tried to post this on the night before the last trip – albeit unsuccessfully! Tables have a habit of upsetting Blogger or vice versa.
Here is the list of kit I took on the Wast Water Fells Trip showing everything packed, inc of food and water. Its changed significantly since previous trips and this should be more like the norm for future multi-day adventures too. The only additional item to add to this list for the next trip is a Montane Featherlite Smock – which I’m well happy with so far.
For all you gear and weight freaks – Enjoy!


